Help the Mailman Reach Your Inbox!

Delivering content to your inbox is a real challenge with increased privacy and security concerns online. If you don’t want to miss anything, you can help us by whitelisting our emails from your favorite services. Below, you will find quick steps you can take to ensure our communications reach you using some of the most popular services out there.
Gmail | Outlook | Yahoo! | Generic Instructions
Gmail

Outlook

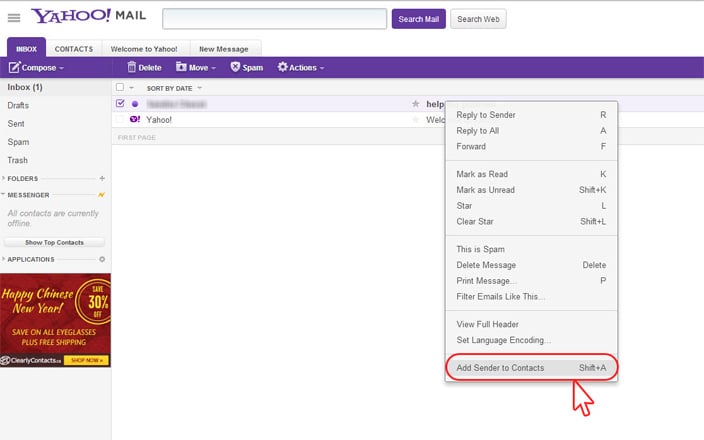
Yahoo!
Generic Instructions
Adding an address to your address book
When you add an e-mail address to your address book, it gets added to a “white list”, meaning you have specified that it is acceptable for you to receive e-mails from this particular person or company. Though we can’t be sure what e-mail client you’re using, they all operate in a similar fashion. Please take a look at the steps below as a guide, and white list your favorite e-mails today!
1. Find the sender’s e-mail address, highlight it and copy it.
2. Look in your e-mail client settings, or on the sidebar or header on the main page of your Webmail client,to see if you have a “contact list”, “safe list”, “address book” or something similar. Click to enter that section.
3. Choose the “add a new contact” option.
4. Paste in the e-mail address you copied in step 1.
5. Click “save” or “ok.”
Having trouble unsubscribing?
Have you unsuccessfully tried unsubscribing from an email newsletter only to continue receiving it? A common issue that may cause this is that often the email address you are trying to unsubscribe from is not the address on the senders’ email list. It’s possible that you have “forwarding” turned on from another e-mail account, meaning messages from an outdated account are being automatically sent to a new account.
Here’s what you can do to resolve this issue:
1. Try unsubscribing other e-mail addresses that you may have and use often.
2. See if your e-mail client allows you to “view the headers” or “show details”. You may be able to see the original destination (e-mail address) that the message was sent to. If found, try unsubscribing that original e-mail address